Friday, August 23, 2013

Test baking - professional Garnet oven at Ohkubo Shokai

Today I had a lovely time at the test kitchen of Ohkubo Shokai in Shakuji Koen - about 30 minutes from the center of Tokyo by train.

Ohkubo Shokai are the suppliers of this European-designed Garnet oven in Japan.  


In commercial terms it is a small oven (59W x 59D x 48H cm exterior), but it is able to bake to a professional standard and as such is attractive for small businesses. When I bought my stand mixer in Kappabashi the kind gents at Yoshida Kashi Douguten strongly recommended this oven to me and mentioned that test baking was a possibility at Ohkubo's test kitchen in Nerima-ku. The kitchen is big and has quite a bit of the equipment you'd need for a trial bake, such as weighing scales, whisks, bowls and sieves, hand/stand mixers, trays and oven gloves. You just take along the ingredients and any special equipment you need. 

Test kitchen at Ohkubo Shokai

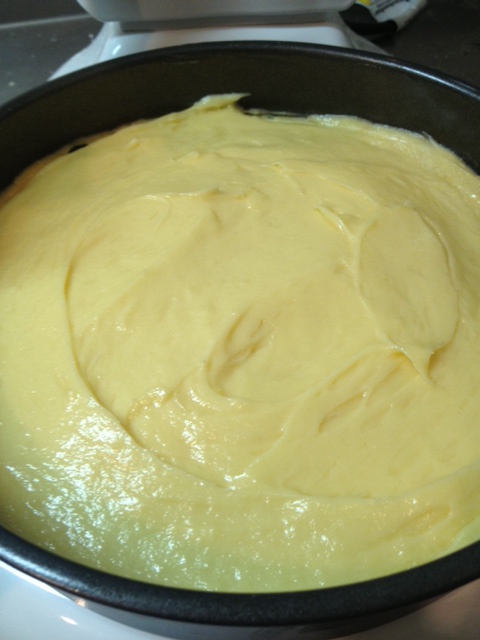
I decided to test out a Victoria sponge cake, in the tradition of Mary Berry testing out home ovens when she worked for Bath electricity board, since it's quick and easy and I know exactly what they taste like from my home oven from the recent tests I've been doing. 

Afternoon tea at Ohkubo Shokai

I also made a couple of sourdoughs as I wanted to see how hot the Garnet oven could go, how well it would colour the crust and I especially wanted to try out the snazzy steam injection function.


If you want to order the steam-capable oven, you will need to have it plumbed into the water mains in your business. Steam is created when you press and hold the button which squirts water from the back of the oven which fizzles and turns to steam quite quickly. 

For my test sourdoughs I didn't spritz them at all before they went in, the crust colour and opening of the slashes is largely down to the steam injection. They did fairly well despite one being a bit over-proofed and the other under-proofed thanks to the logistical challenge of trying get the dough ready for shaping and 2nd proofing upon my arrival in Nerima following a slog through hot and humid Tokyo with a heavy bag of dough. Eeek!


A peculiar feature of the Garnet is that the heating elements (there are 2) and fans are on the right hand side instead of the back, meaning less hot air is lost upon opening the oven door compared to regular ovens. The heaters are around the fans, and so hot air is convected through the oven chamber making preheating and cooling down comparatively fast. Something I was particularly impressed with was how quickly the loaves started to colour. My home oven sometimes has trouble getting a nice crust on anywhere but the top of my sourdough boules, but thanks to the posh convection system of the Garnet, they coloured evenly all over and quickly. 


I used no baking stone or other sole-of-the-oven brick/ceramic tile tricks, yet the base of the bread was also baked and coloured nicely, despite the highest temperature on the dial being 230°C. (My home oven can go to 250°C, but only for 15 minutes, and it appears to be a different type of heat - more hot-spotty? - than the Garnet, where I found 230°C was hot enough and gave a better result than 250°C at home.) 


The Victoria sponges also baked more quickly than in the home oven, and very evenly. There was a noticeable difference in the fine and smooth surface of the cakes, and in the moistness of the crumb. It was a more refined result than I usually get from my home oven, and this was particularly interesting to me.


Reader Ryan recently asked whether a professional oven was really 20 times as good as a domestic oven, considering that the Garnet ovens I'd been writing about were about that much more expensive being just above or below 400,000 JPY depending on whether you needed steam. 

Before I did any test baking I asked the staff at Ohkubo the same question and was told that aside from the factors I'd come up with (a bigger footprint and 4 shelves = so much more output capacity, and the more robust design means that heavy daily usage is ok), the increased power along with the careful design of professional machines mean that the end result is of a much better quality and more consistent than a domestic oven. 

180°C on the dial - 180°C in the oven chamber

Having tested the oven out myself, I can confirm that the baking experience and the end result from my tests today were much, much better than what I'm used to with my pretty-decent home oven. Whether it is indeed 20 times better, and whether that cost is justifiable for any particular business will depend on how important the baked goods are to the business, how efficient you need to be and exactly what is being made.


The nifty stand/rack storage space costs extra (about 70,000 yen), although you might be able to find a cheaper option. It's also possible to stack two of these Garnet ovens together - handy for small shop spaces in Tokyo.

Because the Garnet is smaller and cheaper than a lot of professional ovens, Ohkubo have sold some to customers for use in the home - however note that because the oven is 200v at 20 amps, it can't be plugged into a regular 100v domestic socket in a Japanese house. I gather you might need to have re-wiring done, but please speak with an electrician (and your landlord for permission if necessary!) as I'm not yet clued-up on what this would entail. 

Test baking is available at Ohkubo Shokai by contacting them in Japanese or English via the form on their website to reserve a day to drop by. They have a number of interesting machines for large bakery businesses, but the Garnet oven is currently getting the most interest in terms of test baking.


Dough laminator, and other test kitchen equipment

Saturday, August 10, 2013

Taking the hygiene manager test - requirement for food businesses in Japan


Woo! I'm now the proud owner of this little passport-like booklet proving that I'm now a designated food hygiene manager / 食品衛生責任者 / shokuhin eisei sekininsha. Have a look at this previous post for information on how and where to apply, today's post will be about what was involved in the day itself, and the little test they give you at the end.


The seminars are held a few times a month in locations all over Tokyo, take about 7 hours including a break for lunch, and seat just under 200 people each time. There is a 10,000 JPY fee which you pay in cash on the day, plus 700 yen if you want to buy an official name plate for your premises. You're seated in the order you arrive.


In your welcome pack is a notebook for the day's proceedings and a phone book-sized tome that includes a hundred or so pages of explanation that you'll be taken through during the day and another 100 or so pages of food hygiene-related articles from Japanese law.

Also in there were a handful of leaflets with details of various government-affiliated health, liability and employers' insurance especially for food businesses, some of which are cheaper than commercial options, and many of which had cute drawings and lots of big colourful fonts.


Speaking of cute drawings, check these out! The salient points of the fairly dry lectures were frequently illuminated with characters of germs looking afraid and hygiene managers looking stern and powerful. These ones show the legal requirements for the set-up of the staff hand-washing facilities, and the 3 ways to avoid causing food poisoning from unwanted microbial activity (don't introduce them, don't let them grow, kill them off!).


The first talk was about food hygiene law, and involved lots of kanji being written on a whiteboard, and lots of instruction of when to "赤ライン! / underline in red!" in our books. Handy kanji to know for this section include:
  • 法規 / houki - law
  • 法律 / houritsu - law
  • 憲法 / kenpou - the constitution
  • 業種 / gyoushu - type of industry
  • 許可 / kyoka - permission
  • 厚生労働大臣 / kousei roudou daijin - Minister for Health and Welfare
  • 表示基準 / hyouji kijun - labelling criteria
  • 総合衛生管理製造過程 / sougou eisei kanri seizou katei - HACCP
  • 添加物 / tenkabutsu - additives
  • 禁止 / kinshi - prohibited
  • 条例 / jyourei - regulation
  • 保護 / hogo - protect
  • 公衆 / koushu - public
  • 方針 / houshin - policy
  • 責務 / sekimu - obligation

There are 34 types of food business permitted under Japanese law - including those serving food and drink, those creating and selling confectionary, sales of fish products, sales of dairy-based products etc. - all of which require a designated food hygiene manager  / 食品衛生責任者 / shokuhin eisei sekininsha as well as a business permit / 営業許可 / eigyou kyoka. 7 of these types of business - such as businesses processing meat, fish or dairy products etc. - require a fully qualified hygiene supervisor / 食品衛生管理者 / shokuhin eisei kanrisha, which is a specific career choice, entailing a multi-year course of study rather than an informal 1-day seminar.

The second talk was about public health, and included some really interesting information on  Japanese demographics, illness and society. Have a look at the following tables, the far left column is the years running from 5th year of Showa (1930) until the 23rd year of Heisei (2011), see here for conversions.
The first table paints the familiar picture of a severely aging Japanese society.

Japanese population by age-band

Overall population (column 2, above) has slowed to stay around 127.8 million during the last 13 years. Recently 2 out of 10 people are over 65, set to increase as only 1 out of 10 people is currently under 14. In 1930 almost 4 out of every 10 people were under 14.

This second graph shows the main reason why the population is aging, and why it is projected to shrink to 95.2 million by 2050 - the birth rate in Japan (2nd column) has fallen from 32.4 per 1,000 people to 8.3 in 2011. This chart also shows in the 4th and 5th columns the marriage and divorce rates, which are decreasing and trending upwards respectively.

Birth, death, marriage and divorce rates in Japan

These charts show the main causes of death in Japan (left) and the main causes of food poisoning (right). After high incidences of tuberculosis in the early 1950s, up until the 1980s deaths from cerebrovascular causes such as stroke were the highest, since which point cancer (red line) and heart disease takes over. The food poisoning graph shows that reported cases (this graph is not about deaths) of Norovirus are by far the most common in Japan but that incidences of campylobacter and salmonella do also occur.


Including a short video, the afternoon was about hygiene and food-borne illnesses, and was hard to focus on attentively in the hot room, after lunch (maybe 20% of the attendees were sleeping at this point). There was some important stuff in here though, such as why and how to properly wash your hands - on a slightly related note I wish Tokyo would start providing soap in the public and train station loos!

The shokunineisei sekininsha test

Finally the test. As you can see in the image above, this was a 5-question multiple choice quiz that we were given 5 minutes to answer by writing the appropriate number on slips of paper. These were collected and quickly scored, but my impression is that you get the certificate from just having attended the seminar. No-one got zero points on the day I attended, in fact 70% got 5/5 questions correct. Including me, big swot I am ;).

Most of the mistakes made were with Q3

There is a lot of interesting and important stuff related to you during the day, but there is also a lot of very dry and lengthy reading aloud of laws and responsibilities. You'll be most comfortable if you can read a fair amount of kanji and follow most of what goes on, but much of the day reinforced my feeling that this training seminar is more to do with the Health Centers doing their part (we gave them a copy of their legal requirements so..) and making sure you know that you are responsible if something should go wrong, rather than ensuring that people who attend are fully aware of how to avoid something going wrong.

This probably shouldn't be the sole resource to inform the hygiene policy at your business. A good additional resource would be an online food hygiene course from your home country. Any certifications wouldn't be valid in Japan of course and some of the information will differ (for example regarding egg safety, the emphasis in the Japanese seminar was that only fresh eggs should be eaten raw, whereas in the UK the Department of Health recommends that raw egg recipes be avoided completely), but you'll learn more from extended self-study to protect your customers and livelihood than from a 1-day seminar.

Once you have the hygiene manager certificate it's yours for life without attending this particular seminar again. Once you've registered your business you will receive information from the Health Centre periodically about additional seminars on varied topics that your hygiene manager must attend during the life of your business. If you are an employee then your certificate goes with you to the various companies you work with during your food industry career anywhere in Japan.

So gosh, yes, I am now officially moving closer and closer to be able to legally run my own food biz in Tokyo. Quite scary/exciting!


Wednesday, August 7, 2013

Classic Victoria sponge cake, recipe and comparison of 3 mixing methods

Today a classic British dessert – Victoria sponge cake. Not a dainty number at all, this is a properly rich and hearty, good honest cake and is very easy to make with the right recipe and ingredients you can find in any Japanese supermarket. In America this would probably be called a butter cake.


The cake is connected with the origins of British afternoon teas - Queen Victoria developed a taste for continental-style afternoon refreshments thanks to the fancies of one of her ladies-in-waiting, and this is said to have become one of the Queen's favourite cakes. The 7th Duchess of Bedford had taken to having tea and small snacks in her rooms, to banish "that sinking feeling" during the late afternoon, and this developed into an intimate social event with friends inviting each other for "tea and a walking the fields". Sigh. Ever get the feeling you were born in the wrong century?

The basic recipe is elegant – you use the same weight of butter, flour, and sugar as the eggs, weighed in their shells. Then there is just the issue of baking powder, whether to add vanilla flavouring, and whether you'll be traditional and spread it with raspberry jam only, be lavish and go with a layer of whipped cream or buttercream on top of the jam, or do something interesting with fresh fruit, lemon curd and other crazy things. :)

The traditional adornment is just sprinkled caster sugar

A word or two about baking powder.

Most recipes call for self-raising flour, which is just plain flour with baking powder and salt already added. Then, depending on the recipe, additional baking powder is sometimes added. I compared a few well-known recipes to see the estimated total amount of baking powder per gram of flour and you can see there is quite a range. (Calculations based on assumption that self-raising flour has 5g of baking powder in every 100g, and that a teaspoon of baking powder is 4g.)

Total baking powder per 100 grams of flour in each recipe:
This was a really interesting exercise. The Vanilli sponge is often remarked upon for including so much baking powder, but because there is so much more flour in her recipe it ends up being the lowest concentration of baking powder of the lot.. see, interesting!

Mary Berry's is the highest, and is probably because she uses the all-in-one method of mixing which does not cream-in any air pockets to help with the rise. I started off with the Mary Berry 9g/100g baking powder vs flour ratio for the mixing method tests below, since the Victoria sandwich is her specialty, having made hundreds when working as an oven tester, but surprisingly I found it was too much. This at least gave me the opportunity to demonstrate to you that adding too much baking powder will cause your cake to dip in the middle:

"That sinking feeling" caused by too much baking powder

6 cakes later (yep, 12 layers, baked one at a time.. I can't wait to have a bigger oven at my disposal) having the amount of baking powder sorted, I wanted to see what the difference would be in using the various mixing methods available. Keeping the recipe amounts and cooking times etc. constant I tested the traditional 'creaming method' along with the 'all-in-one method' that is frequently described as foolproof, and a newly popular 'reverse creaming method'.

Victoria sponge cake recipe:
  • 3-4 eggs at room temperature, weighed in their shells (3 large eggs came to 200g for me)
  • Same weight of butter
  • Same weight of plain flour
  • Same weight of sugar (caster sugar is best, see here for advice on sugar in Japan)
  • 12g of baking powder (or amount of flour x 0.06)
  • Couple of splashes of vanilla oil (or essence, or scrapings of half a vanilla pod)
  • Pinch of salt
  • About 4 tablespoons of jam and caster sugar to decorate
- 2 x 20 cm round cake tins preferably with removable bases, greased and lined with parchment.
- Preheat oven to 160°C (170/180°C if not a fan oven)


Method options (pics above show methods 1, 2 and 3, from left to right.)

1 Creaming method
  1. Beat softish butter (about 15-18°C) until slightly lighter in colour, add sugar and beat well until light and fluffy. Good creaming tips here.
  2. Add lightly beaten eggs and vanilla oil into the butter bit-by-bit, adding a teaspoon or so of flour if it starts to curdle. 
  3. In a separate bowl combine sifted flour with baking powder and salt and then add them to the egg mixture, folding in gently and slowly until just combined. 
  4. Split batter between 2 tins and bake on the same shelf for 25 minutes.
  5. Cool completely, place one layer upside down and spread with jam. Cover with second layer and sprinkle sugar on top.

Rev-cream may look curdled, but will be fine.

2 Reverse creaming method ("2-stage method")
  1. Combine sifted flour with baking powder, sugar and salt in stand mixer bowl with paddle attachment.
  2. Add cubes of soft butter (about 18-20°C) and beat at slow then medium speed until just a few pieces remain.
  3. Add lightly beaten eggs and vanilla oil into the mixture bit-by-bit, scraping down the sides once or twice.
  4. Split batter between 2 tins and bake on the same shelf for 25 minutes.
  5. Cool completely, place one layer upside down and spread with jam. Cover with second layer and sprinkle sugar on top.

All-in-one method. But put your flour in last.

3 All-in-one method
  1. Have your butter soft (about 18-20°C). Combine sifted flour, baking powder and salt.
  2. Dump all ingredients in a large bowl, flour mixture last to avoid patches of dry flour being trapped at the bottom.
  3. Beat on slow then medium speed to avoid a mess, until just incorporated.
  4. Split batter between 2 tins and bake on the same shelf for 25 minutes.
  5. Cool completely, place one layer upside down and spread with jam. Cover with second layer and sprinkle sugar on top.

Pulling away from sides of pan, browned, skewer comes out clean

Extra tips:
  • Whisk/stir the sifted dry ingredients together to distribute the baking powder evenly.
  • Creaming and all-in-one method are possible to make by hand or with a hand-held mixer (just use a large bowl and start off at low speed to avoid the flour going everywhere), reverse creaming is probably best with a stand mixer.
  • The batter should be easily spreadable in the tin rather than free-flowing. However, if the batter is very thick, add a little milk to loosen it.
  • It's fine to have one layer hanging about for half an hour, better to do this if your oven won't fit two tins on one shelf, so that they will bake evenly.
  • If you're using whipped cream as a filling, you want it fairly stiff to hold the weight of the top layer. Use a cream with a high fat percentage such as 45 or 48%. If you want to be particularly neat, piping the cream in a spiral on top of the jam, starting from the outside edge is a good way to get a firm even layer. It's also fun to have it dolloped on in a more rustic manner.

4 tablespoons of jam was plenty for me


Verdict on the 3 mixing methods (all sets of photos show methods 1-3, lined up from left to right)

First things first, the taste of these cakes was identical, even the initial sunken tests tasted good. :)

The all-in-one method is definitely the simplest, it is pretty fail-safe provided your butter and eggs aren't too cold. Most Victoria sponge recipes these days seem to use this method.


I noticed that an attractive frill around the top edge of the sponges (image above) tends to develop more when using the all-in-one method than others, not sure why this is the case but I quite like it. I found this cake had an ever so slightly coarser crumb, although it had a nicely domed top like the creaming method cake.


The creaming method has the potential to deliver the highest cake of the lot, since you're whipping air into the butter with the sugar at the beginning and this adds to the lift brought about by the leavening agent. Certainly the center of the creaming method cake was the highest of the 3 in my test (6.3cm vs 4cm at the edges!).


The one that was more noticeably different, although only if you were looking for it really, was the reverse-creaming method. This cake had the finest crumb, meaning that the grains of sponge and most of the holes between them appeared smaller, more evenly distributed. The effect was a little more lacy than the others. The top of the sponge was decidedly flatter too (5 cm in the center, 4.5 cm at the edge), a useful feature if you are planning to decorate the top with cream and fruit.


It was a smarter looking cake, though a bit less traditional than the gently sloping hillocks that were the other two. The idea behind reverse-creaming is that by coating all the flour grains in fat before liquid is present, you inhibit the development of gluten, and so the cake should be the least tough and not remotely chewy.

This method is often attributed to Rose Levy Beranbaum who popularised it in 1980's, but is cited in The Science of Good Cooking as being invented in the 1940's by General Mills and Pillsbury. The Lilly Vanilli pillow cake also uses a similar reverse-creaming method (although my test cake uses this method, it doesn't have the same high flour and sugar to butter ratio of Vanilli's recipe and so is definitely more of a Victoria sponge than a pillow cake).

So in summary, use the all-in-one method for speed and reliability, reverse-cream for fine crumb and sturdy structure for layering, and use the traditional creaming method if you want to aim for height.

I hope this was helpful or interesting. Aside from the nostalgia trip, these are just lovely cakes to make and eat, I particularly like the whiff of caramel when you're peeling the backing paper off the sponges. It would be an excellent offering at a picnic - robust enough to survive transporting to the park, and the variety without cream should hold up particularly well even on a sunny day.

And should you, horror of horrors, find yourself with Victoria sponge left-overs, you could chop it up and turn it into a rather lovely sherry trifle, especially if it's a little stale.