Monday, December 3, 2012

Marzipan / almond paste in Japan, and a blind tasting test!

Last week I marzipaned the Christmas cake so that there will be time for it, and later on the royal icing, to dry completely before I head off to the UK for Christmas. Exciting!

Marzipan making night

I made the marzipan I used on the Christmas cake from this Delia Smith recipe, which involves whisking egg yolks and sugar using a bain-marie. You can measure the temperature during the 12-minute whisking stage and make sure it either reaches 71°C or is maintained above 60°C for over 3.5 minutes to kill any salmonella that could be in the egg.


Most British recipes for marzipan contain eggs in some form, frequently raw as in the photos below, but if you check the ingredient list of most shop-bought UK marzipan you'll see it does not.


Indeed, in Germany where they have refined marzipan making to a national craft, eggs appear only rarely to be used. Many eggless recipes involve heating water and sugar, and sometimes glucose to a specific temperature and pouring the hot syrup onto the ground nuts.

Heated to 118C, this syrup became clear and bubbly

I was interested to learn that there are specific legal requirements that need to be met in Germany to be able to call a product marzipan, including that it consists of at least 50% almond paste (marzipanrohmasse) which in itself can consist of only almonds, sugar and water and/or rose water.

The names 'marzipan' and 'almond paste' are often used interchangeably outside Germany, but it's probably helpful to think of almond paste as being a base for making the regular cake-covering/modeling marzipan (add more sugar). Almond paste is also used in baking and for making confections. Here is a breakdown of some of the different classifications of marzipan used in Germany.

Anyway back to the homemade stuff - I wanted to see what discernable differences there are between types of marzipan with/without eggs, cooked vs. raw, almonds vs *other nuts!* and so embarked upon a big making session followed by a blind tasting.

Serious stuff, this!

I subjected my partner, who didn't complain too much, to a taste test before work one morning. We tried out the following marzipans:

A - Shop-bought in France, just before its best before date. A 'control', if you will.
B- Delia Smith's, a cooked version (if you measure the temperature to 71°C) with eggs.
C- Cottage Smallholder recipe, raw with eggs.
D- Dan Lepard's Pecan marzipan (but made with walnuts, for lack of pecans), cooked with eggs.
E- Peter Greweling's eggless recipe, but made with hazelnuts, cooked.
F- BBC Good Food's zesty orange marzipan, raw with eggs.


Our verdict was that out of the homemade versions, the Delia 'cooked' version had a texture that was closest to shop-bought marzipan, as it was drier and finer-grained. All of the raw marzipans were comparably wet and sticky, which was a lovely feature when used inside stollen, but could be challenging to roll out to cover a cake - I'd recommend being prepared to use a little more almond powder and sugar in either C or F recipes to combat that (particularly F).


The non-almond versions were lovely, especially the Dan Lepard version, D although I don't understand why both the glucose and the glycerine were necessary. Either way I'm now going to have to get more nuts to try the pecan version - maybe with bourbon. I'm also curious to have a go at something with just/mainly honey and almonds to see how that tastes and behaves.


D was a little crumblier in texture but I think that was more to do with the ground walnuts (done in a blender) being less uniform than the pre-ground almond powder I used for many of the other recipes. There is so much scope for variation - cardamon-flavoured Iranian toot, pistachio marzipan, cinnamon and other spices, pine nuts and perhaps trying something like one of my absolute favourite nut paste treats turron de jijona.

I also tried baking the marzipan to see if any of the different versions would melt away, and none did. It all browned quite quickly in a hot oven, and A and E (eggless) remained wetter inside compared with the other versions. Delia marzipan (B) was the firmest on baking and reminded me of the texture of white anko paste.. I'd say the Delia recipe is best eaten cold/used to cover cakes.


I now have a ton of marzipan :) Aside from covering the Christmas cake I'm experimenting using the different flavours to stuff my stollen loaves, using some to as alternative mince pie lids, and having slices of the walnut one in particular with glasses of sherry. Cheers!

If you're not interested in having a go at making your own, you can buy marzipan online in Japan from quite a few places as it turns out, starting with here and here. It’s most commonly called マジパン / majipan, which usually refers to the high sugar content type of regular marzipan we're all familiar with that's good for covering cakes (at least 50% sugar). Even if you are making your own you might still find it more economical to order your ground almonds and powdered sugar online too (Nissin supermarket almond powder is 980 yen for 350g and you can pay just slightly over 1,000 yen for about 1kg online).

You'll find almond paste / marzipanrohmasse referred to as マジパンローマッセ / majipan rohmasse or ローマジパン / roh majipan / raw marzipan. Both of these names refer to the higher nut-to-sugar ratio almond paste (2:1 nuts to sugar, with up to 35% sugar). Incidentally you can get the real thing - Lübecker marzipanrohmasse in Japan too, I'm definitely going to have to check some of that out!

The history of marzipan and its etymology are contested and fascinating. The tradition of kneading ground nuts with a binding agent such as honey goes back at least as far as 1800 BC Egypt, but the particular almond and sugar incarnation is claimed to be originally Iranian, or Chinese, Spanish, possibly Italian... There are stories in Arabian Nights of marzipan being used during Ramadan and of it being an aphrodisiac, and of it being transported to Europe by crusaders. Other origin stories involve resourceful Toledo nuns, inventive French cooks, and a day-dreaming Venetian baker's daughter making a mistake with a recipe. It was supposed to have been used as a palate cleanser at medieval banquets, in times when sugar and almonds were expensive it was a gift fit for royalty, then in the 18th century Germany it was given as a christening present.
Today the taste of marzipan appears to divide people almost as much as does coriander.

The unusual name is variously explained as coming from March bread, St. Marc's bread, little box, the king who sits still ..! To quote from the online etymology dictionary:
"marzipan (n.) 1901 (in modern use; earlier march payne, late 15c., from French or Dutch), from Ger. Marzipan, from It. marzapane "candy box," from M.L. matapanus "small box," earlier, "coin bearing image of seated Christ" (altered in Italian by folk etymology as though from L. Marci panis "bread of Mark"), of uncertain origin. One suggestion is that this is from Arabic mawthaban "king who sits still." Nobody seems to quite accept this, but nobody has a better idea. The Medieval Latin word also is the source of Sp. marzapan, Fr. massepain."


Monday, November 26, 2012

Bramley apple pie - pre-cooked filling vs. apple slices filling

Apple pie is my favourite thing to make (and eat) with Bramley apples (this link includes updated information on how to get them in Japan), with a crumbly double pie-crust made with simple all-butter shortcrust pastry, or a rich sweet shortcrust pastry. As I rave about excitedly in my first Bramleys in Japan post, British style apple pie made with Bramley cooking apples is tarter than American apple pie, and the apples end up as more of a fluffy puree rather than clearly defined slices. It is the taste from the tree in my childhood house.

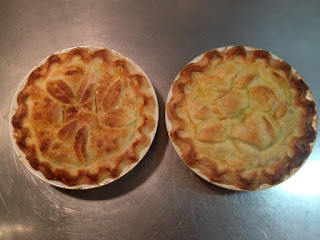
Pre-cooked filling on left, apple slice filling on right

Working from a basic recipe you can add all kinds of things to the filling (sultanas, nuts, cinnamon  cloves, a splash or steeping of a choice alcohol, lemon or orange zest, some flour or cornflour if you find your apples produce too much juice, caramel sauce, marzipan..) and/or to the pastry itself (ground almonds or hazelnuts, cheddar cheese, a little baking powder, spices...). Depending on the type of dish you use, the nature of your oven and how you want your pie too look, you will also be able to change the amount of ingredients, cooking times, and temperatures.

To get started with a basic recipe, you’ll need roughly 500g of shortcrust pastry and 700g of Bramley apples (about 2 large ones) for a 22 cm pie dish. I used about 500g of apples for each of the 18 cm shallow-dish pies in this post.

Sweet shortcrust pastry (about 500g)
  • 275g flour
  • 175g chilled butter, diced
  • Pinch of salt
  • 25g sugar
  • 1 egg, beaten
  • 2 tablespoons of cold water

Pie filling
  • About 700g of Bramley apples for a 22cm pie dish
  • Squeeze of lemon juice
  • Between 0 - 100g of sugar, depending how tart your apples/sweet your tooth
  • 25g of butter, diced
  • Any additional ingredients of your choosing (spices, nuts etc..)

For the pastry, sift the flour and salt and rub the cold butter into flour briefly, until there are no very large lumps of butter left, stir in the sugar. Mix in the beaten egg and cold water with a round bladed knife and bring the dough together into a flat disc with your hands. Wrap in plastic and chill for at least 30 minutes, bringing it out of the fridge again 15 mins or so before you need to roll it out so that it's still cold but not solid to roll. Top tip! - if the sweet pastry misbehaves when rolling, try rolling it between two lightly floured sheets of plastic wrap, peeling them away carefully when you line the pie dish. Prick the base with a fork, scatter with ground almonds (optional) and leave the pastry hanging over the edge until you place the lid.


For the filling you can either peel and core the apples, cut them into chunks and -
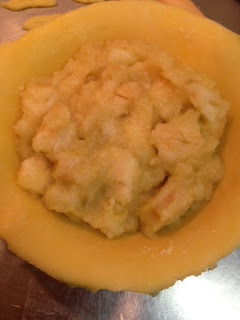
a) heat them through in a saucepan with the lemon juice, sugar and butter until they start to soften into a puree to use in the filling (some chunks of apple left in the puree are fine, and desirable.) Be sure to let your puree cool completely before using so that you don’t prematurely melt the butter in the bottom crust of the pie (1st photo), or you can -
b) toss them in some lemon juice and sugar and pile them in the pastry-lined pie dish as raw chunks with little bits of butter dotted over them before putting the pastry lid on the pie (2nd photo).


With your preferred filling in place, wet around the edges of the bottom crust and lift your lid on top. Cut a couple of slits or holes for air vents and press down gently around the edge of the lid to secure it and push out the air. Hold your dish like a waiter with a tray, and slice off the over-hanging crust (if you love lots of crust, you could instead fold the lid and overhang under itself, a bit more American-style pie maybe? Nice link here on American-style crimping and tips on lattice top pies too).


Crimp edges or press down around the edge with a fork to make a pattern, and decorate to your heart's content with the pastry trimmings - my favourite part when I was little. You can freeze/chill the pie at this point for later baking, or brush the finished pie with milk (which I prefer) or egg wash (as used in these examples), sprinkle with sugar and bake. My little pies for this post took 25 minutes at 190°C, a 22 cm pie will probably be closer to 40 minutes.


If you are using the raw fruit method in particular, you will need to use quite a hot oven temperature (190-220°C) to get the pieces of fruit to go soft inside the pie. Be ready with some foil to drape over the top of the pie (or fold loosely around the edges of the pie) if you notice the pastry browning too quickly on top - this is a particular problem with small ovens used in Japan, as your pie will take up most of the space in the oven and be quite close to the oven roof.

No, these aren't the ideal dishes for baking pie...

The differences between the two methods of preparing the filling are that the pre-cooked filling (on the left) is a flatter pie with a more dense and jammy filling, whereas the raw fruit method (on the right-side) gives a more dome-like shape, often with pockets of space under the top crust of the pie as the Bramley apple pieces mush somewhat during baking and reduce in size. It makes for a rustic, bobbly appearance to the lid of the pie, and probably also helps to prevent soggy-bottomed pastry, as the filling only becomes wet with juice after the pastry base already has had time to bake.


Heating up the baking tray in advance in a hot 220°C or so oven, ahead of reducing the temperature to your normal baking temperature, will also help to cook the bottom crust properly for either filling method. Using an enamel pie dish will also help you get a good bake on the base, and if you use a glass dish you'll be able to see at any point how well the base is doing.

If you have pastry left over you could make jam tarts or mince pies! (Which is another fine use for Bramleys...)

Mini mince pies with homemade Christmas mincemeat filling

Making up a double batch of the sweet shortcrust pastry isn't a bad idea as it keeps for a 3 days in the fridge, and freezes well for up to 3 months.

--
Here are a few good alternative pastry recipes that work well with apple pie:

Classic plain shortcrust, half fat to flour, no sugar. Good photos:
http://www.deliaonline.com/how-to-cook/baking/how-to-make-shortcrust-pastry.html
Sweet shortcrust made with icing sugar, butter, eggs and milk: 
http://www.jamieoliver.com/recipes/pastry-cake/old-fashioned-sweet-shortcrust-pastry
French-style sweet pastry made with the creaming method:
http://www.bbc.co.uk/food/recipes/pate_sucree_39572
Cheddar cheese crust apple pie recipe from Delia Smith:

Thursday, November 15, 2012

Start-up costs for a small bakery/café in Tokyo

I came across an interesting series of articles in Japanese magazine Café Sweets which introduced 3 recently opened cafes in Japan and listed their start-up costs and average sales per customer and so on.


Here is the information from the images above:
  • 8-seater café in Meguro-ku with 2 staff, took 15,000,000 JPY in start-up costs (about $185,000 / £119,000). Monthly sales goal of 2,000,000 JPY ($25,000/£16,000), with current estimated sales at 680,000 JPY ($8,500/£5,300). 
  • Café with 20-seats in Setagaya-ku, 4 staff. 10,000,000 JPY cost at start-up ($125,000/ £79,000). Monthly sales goal 1,800,000 JPY ($22,600/£14,000), current estimated sales of 1,512,000 JPY ($19,000/£12,000). 
  • Café in Ishikawa prefecture with 28-seats and 2 staff took 8,000,000 JPY to get started ($100,000/ £63,000). No monthly goal stated, but current estimated sales of 600,000 JPY ($7,500/£4,700). 

Although it appears quite possible to spend 15 million yen and more to set up a small cafe, I've spoken to business owners in Tokyo who have spent much less than even the lowest start-up cost of 8-million yen listed here, so it is possible to do it more cheaply than these articles suggest. It also occurred to me that it might be in the magazine's best interest to talk up the costs slightly to be responsible and encourage sufficient planning.

The shop rent and real estate fees aren't stated explicitly in the magazine's break-down, but all 3 examples took between 1.3 - 2-million yen to acquire the spaces which we can assume includes rent, deposit, agent's fee etc. The business owners in the article spent 49 - 72% of their start-up funds on reforming the space and fitting the kitchen, and so doing up the space is definitely an area you could focus on to try to reduce initial costs. Perhaps you can break down the old space yourself, keep the new design simple to start with, buy some of the non-critical equipment and furnishings second hand, search hard for space reform contractors who can give you a great deal, and look into recently closed 'going concern' / 居抜 / inuki spaces that still have kitchens and some of the items you might need in place.

The small café based in Meguro-ku in particular looks to have some challenges ahead, just based on the figures - with a stated goal of 2-million a month in sales, and an average sales price of 900 yen per person, they are going to have to make themselves available to and able to serve over 2,200 customers a month instead of their current 755, either that or increase the average sales price, or cut costs to allow for a lower monthly goal. Gosh. It appears to be part of a larger chain of coffee shops however, so perhaps there is financial support from the parent company during the initial stages.

By way of comparison, here is an article from New York magazine a few years ago telling the stories and listing the costs involved in setting up a bakery, restaurant, or wine bar in New York. Even accounting for inflation, the start-up costs for Babycakes in New York were considerably lower than those published in the Tokyo magazine:

Babycakes NYC startup costs (recalculated to 2012, considering US inflation)
  • Total Start-Up Costs= $43,600 (about £27,000/3,490,000 JPY) Rough Monthly Expenses= $13,300 (about £8,300), including rent of $3,200 a month. 
Despite the NYmag article painting the owner Erin as perhaps not best-prepared shortly after the business had opened (not having enough start-up money, paying staff in cash, a tight business model with low margins...) it looks like things worked out great for Babycakes, the business seems to be going strong 6 years later - http://www.babycakesnyc.com/


Wednesday, November 14, 2012

Might your ward office help you set up your small business in Tokyo?

Just a short and sweet post today, to get the word out in English that many ward offices in Tokyo have various support services for small and medium-sized businesses that are based in their jurisdiction. Even the helpful chaps at Tokyo Business Entry Point neglected to mention that such services are available and so I thought people might like to know.

In the case of Minato-ku small business support services include free ‘business advisor’ consultation to do things such as go over your business plan, low interest loans for new businesses, rent subsidies, incentive grants to companies to encourage the use of parental leave, subsidies towards setting up or improving your website etc. (All above links in Japanese.)

It’s certainly worth having a look for information on services offered by your own ward office, as each area offers varying support each with their own deadlines for application.

You’ll probably need to look in Japanese, and could start with Googling the name of your ward (Minato ku, Setagaya ku) + 中小企業 支援 / chuushokigyou shien / small medium business support, or the name of your ward + 融資あっせん制度 / yuushi assen seido / financial assistance system. Note that the ward office in question will need to be that of your business address and not your home address, if the two are different.

Good luck, and I hope this information helps someone realise their plans!

Wednesday, October 31, 2012

My first practice catering gig!

A friend asked me to do the desserts for her sayonara tea-party. Apart from being able to contribute something nice for my friend’s special day, I thought it would also be a good chance to practice a bit of the time-management and planning side of running a food business.


The order included a couple of Victoria sponge cakes, 2 dozen cupcakes, shortbread jam heart biscuits, some gluten-free chocolate sparkle cookies and a couple of carrot cakes. Oh! And 20 mini lemon meringues. I also did a few mini scones to be had with the rest of the jam.


It was quite a challenge trying to complete this order in my tiny 1-shelf oven, which necessitated the making of things in very small batches. That’s right folks, jammy heart sandwich cookies can only be made 6 at a time – that’s 6 halves at a time, and so an order of 20 take 7 trips to the oven.. and all the layer cakes have to be made a layer at a time too.. goodness.


Advance calculations I made estimating the time needed to prepare and bake the order came to about 24 hours (!). This was mainly due to the aforementioned diddy oven issue, but also because there is a lot of variation in the order as opposed to bulk production of the same thing. Just to be on the safe side I very happily took a day off my office work and also got a head-start on some things the night before the main production day. Tomas Haas' chocolate sparkle cookie dough for example, needed to be chilled overnight anyway. 


I had images of my (also tiny) home kitchen looking like a bomb-site, and surfaces around the house needing to be stacked with various cooling and packed-up goodies, but in the end tidying up as I finished each part meant it wasn't unmanageable. With the help of decent sized cake boxes, large Tupperware and a couple of large IKEA bags, I was also able to transport the whole order (and two bottles of bubbly) by taxi with the help of a friend. We also managed to avoid throwing the whole lot on the pavement outside the party girl’s flat, another image I’d been trying to push out of my mind. One other thing I learned is that being on your feet all day is hard! I'll have to start physical training for my transition from office job to baker. :)

Since there were 2 of each full-sized cake I decided to do something a bit different with each. One of the carrot cakes was made with walnuts and the other with pecans.


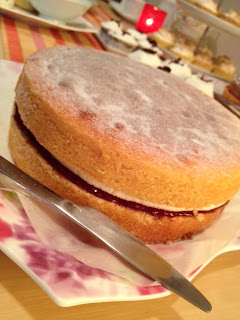
I did a traditional Victoria sponge that just had jam inside (home made strawberry champagne jam), and another with raspberry jam and chantilly cream.

Victoria sponge cake, a classic

The more traditional filling, with an experimental decoration

Sift icing sugar through doily, remove carefully!

Half the cupcakes were in my friend’s favourite style, with a cream cheese frosting topped with blueberries and edible flowers, and the other half were moist chocolate cakes with a dollop of ganache in the center, topped with a simple vanilla butter cream frosting and curls of dark chocolate.


All in all it went very well! There was plenty to go around and people enjoyed having something ‘nastukashii’ or nostalgic aside from just cupcakes, there was talk of Grandmothers and time in the kitchen as a child. Japanese friends got to try things like the Victoria sponges that they’d seen in recipe books but not tasted before. Everyone ate too much cake... hmm.

Natsukashii!

There were a couple of things I’d do differently – not pipe the meringue down into the pastry cases to avoid a couple of them cracking on expansion of the meringue, and maybe a thicker filling to the carrot cakes, but my friend was thrilled and I was happy with the items I took. Definitely be easier with a more professional kitchen. ;)

Friday, October 19, 2012

Getting a food business permit - visiting the public health center


This week I got around to paying a visit to the Minato-ku public health center / みなと保健所 生活衛生センター / Minato Hokensho seikatsu eisei senta. A short walk from Azabu Juban and sandwiched between large Mita hospitals, the health center is in charge of inspections for food businesses, and deals with various other public health issues for the Minato ward area including disease control, pest control, hygiene, and food regulation.

On the 5th floor there is a long counter with stations for consultations in Japanese regarding food businesses - if your premises is in Minato ku this is where you will need to come to apply for an inspection in order to get your business permit. If you are at that stage already, there's more information on that process in my previous post.

I'm not at the space-hunting stage yet, but wanted to check a couple of things to help with planning my business model as the requirements might impact the kind of space I will need to look for.

I would like to have a multi-purpose space - which could be a cafe while also being a workshop for the bakery and orders, as well as allowing me to hold practical lessons - but I learned that a local bread school were not allowed to use their teaching kitchen as a commercial space, and so I wanted to know exactly why. It turns out that the problem is with who can enter the kitchen / 厨房 / chuubou - if I keep my kitchen quite separate from the café area through the use of a counter and a swing door for example, and do not allow customers or students into the kitchen, then I can use the café area outside business hours to teach. Of course this will mean I'll have to get creative with using tables as workstations and make sure only me and my staff ferry trays and things to the kitchen, but it looks like there may be a way to make this work, legally, in a small space.

This also means that if you are running a bakery from home in Japan, apart from your facilities meeting the confectionery business permit requirements, they will also have to be in what amounts to a second kitchen to be used solely for your business activities. The health center staff confirmed that a business permit will not be granted to a food business using their regular domestic kitchen because family members using the space and your own domestic food preparation presents a health hazard for a commercial food business.

Basic requirements for a food business permit

On the back of the application is a list of the basic requirements you'll need to meet, along with diagrams. I've done a rough translation here, but do check with your ward office as requirements are different for each area (these from Hiroshima are very nicely illustrated) and may change.
  1. Building – made out of suitably durable material
  2. Plan – walls and boards etc. made of suitable material and arranged appropriately for intended purpose
  3. Floor – comprised of easy to clean and water resistant material
  4. Interior walls – at least the bottom meter should be water resistant and washable
  5. Ceiling and walls – made of easy to clean material
  6. Ventilation – there should be separate ventilation for customer area and kitchen
  7. Kitchen sinks – need to have at least 2 (of at least the dimensions in the 1st image below)
  8. Hot water – to aid hygiene there needs to be hot running water
  9. Staff hand-washing sink – need to be in the kitchen and in the visitor area (of at least the dimensions in the 2nd image below)
  10. Hand sanitation – should be provided at the staff hand-washing sink (9)
  11. Refrigeration – units need to be big enough to hold the required amount of chilled food appropriately
  12. Temperature regulation – thermometers should be placed in the refrigeration/freezing units and in the kitchen area
  13. Storage – there is shelving of adequate size to store the number and sizes of vessels required for the business 
  14. Waste disposal – bins are of sufficient size and have lids
  15. Cleaning equipment – have their own storage area
  16. Changing room or locker – is outside the kitchen area
  17. Customer area – should be positioned so as not to interfere with food preparation areas, and a toilet should be provided


Much of what they wanted to emphasise to me when I visited was about the sinks - that in addition to a staff hand-washing sink, there should be two kitchen sinks for a restaurant/cafe type permit, or one kitchen sink if it was only a confectionery business without eat-in areas, and that these all had to meet the specified sizes.

Since I was there, I took the opportunity to ask a few additional things. The staff who helped me were amused at how strict the international examples I came up with seemed to be - apparently there is no legal requirement in Japan for egg products to be brought above 71 °C, and there are no regulations about the weight of bread. Grease traps, which are a legal requirement for commercial kitchens in many countries are not legally required in Japan (at least, according to the staff I spoke to), but your building owner may want you to have one fitted, and it makes sense to adhere to best practice regarding waste fats, oil and grease disposal even if it isn't a legal requirement.

Finally, I checked but there are currently no resources available in English to help with the process, and all consultation is in Japanese. The staff at the Minato public health center said that other ward areas may provide this information, so if you are in another area it's worth asking!